 So, you've finally done it. You've bought Vellum. Maybe you even had to buy your first Mac to do it. You've probably figured out how to make style choices or add elements from the tutorial, but what about those little details? How do you make the most of your new software and make your books the prettiest they've ever been with a minimum of headaches?
After recently reformatting several of my books with my brand new copy of Vellum, I have some tips to share.
Find
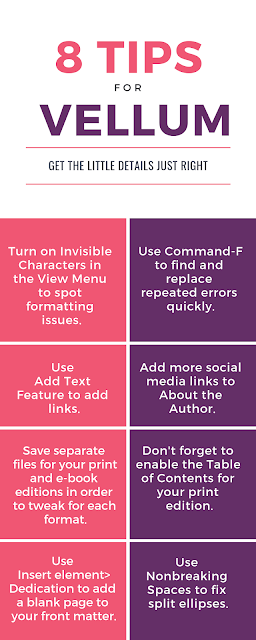
The Find function works as in other apps on Mac. Just hit Command-F to bring up the search window. You can also find and replace to correct multiple identical errors at once, just like in Word.
Invisible Characters
In the View menu at the top of your screen, toggle on "Invisible Characters" to help you with niggling format problems like extra spaces and split ellipses. Speaking of split ellipses . . .
Split Ellipses
A lot of people prefer to write an ellipsis as ". . . " rather than " ... ". It's just more attractive and easier on the eyes. But then you run into the problem of line-splitting and page-splitting disrupting your ellipses. To fix ellipses that are running over the end of the line, you want to make sure that spaces between the periods are non-breaking spaces. You should also having a non-breaking space between the last word and the start of the ellipsis. To make a nonbreaking space on a Mac, including in Vellum, hit "option-space" instead of "space." Turn on Invisible Characters, do one ellipsis correctly, then use Find to fix all the wrong ones in one go. Problem solved.
Table of Contents
Vellum will automatically generate your table of contents. However, the default setting seems to be to only generate it in e-book formats. To have it auto-generate the ToC in the print edition, make sure that you have clicked "Include in > All editions" under the Settings wheel of your Contents section.
Print vs. E-book Versions
Once you have dealt with all of your corrections in your Vellum file, you might find it convenient to save separate copy of the file for the print version if you think there are elements that might differ significantly between formats. I, for example, have a map at the front of some of my fantasy novels. In the mobi file, I simply have it as a photograph on a page by itself. That way, it is clickable for the reader to enlarge it on their e-reader. In the print version, on the other hand, I have it as two separate images, each with one half of the map, inserted as two "full page images" on facing pages.
Blank pages
Speaking of the print edition, if you find yourself needing to insert a blank page into your front matter for some reason (like getting your map to show up on facing pages), try clicking "Insert element > Dedication." Then delete anything written in the section you've just inserted and move it to where it is needed.
Social media links
In your "About the Author" section, Vellum prompts you to include Facebook, Twitter, and Instagram links. You can also click on the plus sign to add other platforms, such as Pinterest and Bookbub. If you want to include the links in the print version, be sure to toggle that choice in the menu.
Adding other links
To add links in the text, highlight the relevant text, two-finger click, and select "Add Text Feature." You can then choose "Store link" or "Web link." Paste in the link, and you are good to go.
I hope these tips will help you save time and avoid confusion when you use Vellum. Please share any tips of your own in the comments. Take care, and keep writing!


I used Vellum for the first time to publish my e-book on February 28th, 2019. I'm happy with it, and I'm going to use your tips to double-check for any formatting issues.
ReplyDeleteThanks, Susanne
This is such a helpful post. Thank you! I'm glad I found it. I was one of those authors who purchased a Mac just so that I could have Vellum. One thing I can't figure out is how to get Invisible Characters to become available to select.
ReplyDelete